Showing posts with label Leather Spine. Show all posts

Friday, September 21, 2012

Project: Spine Repair


Every once in a while I get a project that's rather interesting. Take this project: I will be repairing the spine of an old bible that was originally bound in the late 1800's. The client wants me to raise the tapes to make them more pronounced and then cover the spine and boards as a half-bound book.

This book is a Fanshaw Bible for the 'American Bible Society' printed in 1834 (ok, so I guessed on the 'late 1800's part). It measures 12 inches by 9.5 inches with a three inch spine (boards included).


What I've been asked to do is to raise the tapes a bit higher to resemble thick cords, recover the spine with new leather to ensure that it can be used as a bible once more. Additionally the client wants the cover boards covered with kraft paper (as the original boards have been torn and faded over time - I understand that the bible was recovered from a Barn) and the corners reinforced with new leather.

9.21.12
Progress on the book continues. I've mounted leather spacers on the tapes to raise them higher on the spine as a design feature. The book has been covered with brown, kraft paper to help reinforce the structural strength of the cover boards and give the spine more flexibility without additional damage. 
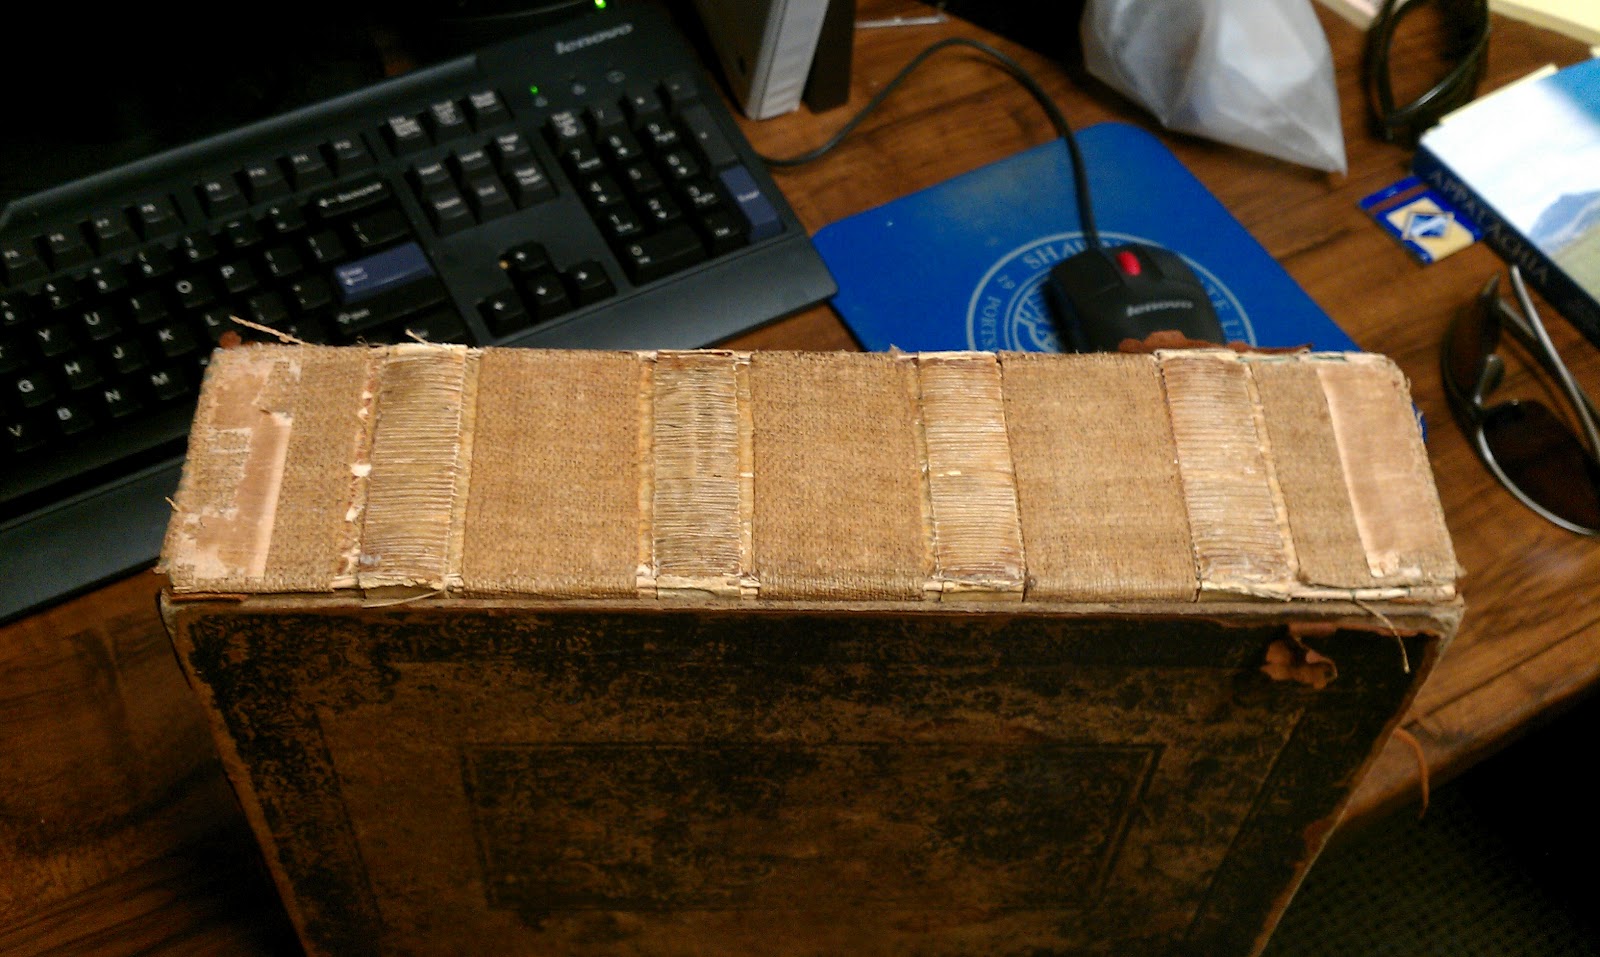
Four, three-quarter inch tapes are used to hold this book together. Surprisingly, even after more than a hundred and fifty years the tapes are still secure the stitching hasn't frayed.

I had to take a picture of the mega-tapes that the binders used to produce this book. Three-quarter inch tapes are used for massive books and with two and a half inches of text - it needs the support.

The quality of the cover boards, even now after nearly a hundred and seventy years, is amazing. You can still see the design that was printed on the cover boards all those years ago and even with all of the damage that the book has seen it's still maintained a sense of its own character.

As you can see - the spine virtually disintegrated of the original cover and the boards are faded and in need of repair or replacement.


The cover page of the bible.
The new tapes drying.

The bible has been covered in a single layer of Kraft paper with the tapes bolded (pressed and the sides cut to keep the shapes more pronounced)

I set the book in the pressing frame so that I could tie up the tapes.By using the pressing frame, the book doesn't have to support itself on its covers (which still aren't as sturdy as they should be) and I can use the sides of the boards to mount some pseudo-lacing frame pegs.
To tie up the tapes I needed to install some pegs so that the cords would have something to hold onto. Rather than using permanent pegs I just used some thumb tacks since they're cheap, disposable and removable once I'm done.

So here's what the spine looks like when the tapes are tied up. The ties are used to press the leather down against the spine on either side of the tape and therefore accentuate them.


I have to wait for the glue to dry and then I can start tacking down the spine leather onto the cover boards.

Tuesday, March 27, 2012

BOOK: Burnt-Paper Cover

This is a paper-covered book that I added small bits of scorched paper as a decorative element. The spine of the book was covered in leather. I made it small - as an experiment to see if I liked the burnt-paper look - so it's only the size of a "Brick".

The book was created in the summer of 2011.

Friday, October 28, 2011

BOOK: Wedding Album


This is a wedding album I made for some friends using a variety of techniques. This was mostly an experimental project as they weren't too specific about what they wanted so I tried a few new ideas.

1. The idea of creating a 'window' for a photograph at the front of the book had gotten my attention a while back but the design element practically screams "photo album". I created the raised border using grey-board and added a layer of thin, brown paper over it to remove some of the 'seams'.

2. I used a Half-Cover bind with leather corners and spine since I was running out of leather.

3. I wanted to try a 'window in a window' or 'border inside of a border' design element where the outside of the book has a raised border and then another border set inside the edge. I think it really brings some interesting design elements to the cover of the book but will have to fiddle with how I use it on future projects.

Thursday, June 23, 2011

BOOK: Colophone Journal

This journal is a size 3 (5.5 x 8.5) double fold with a colophone on the top cover a closing flap and a peg-and-loop closure.

What does that mean?

Well, a Double-Fold book has two books within the same cover. A Colophone is a symbol or design that is unique to the owner of the book. In this case the colophone was created as an embossed (raised) design. The closing flap, shown on the right, helps hold the book closed and is part of the peg-and-loop (shown with the pencil).

Dimensions:
8.5 x 5.5
200 pages per section


BOOK: Paladrym: Double Fold Journal

A Double-Fold Journal is a combination of two books within the same cover.

Dimensions:
Books (9 x 12)
200 pages Internal book
300 pages Main book

BOOK: The Blue Star


Title: The Blue Star
Dimensions: 9 x 12 x 3
Construction: Double-Fold, size 5* with equally sized book-blocks for the two sections.

The Blue Star is a double-fold journal that I made for a friend of mine using blue, goat skin.


The journal gets its name from the large blue star that I cut into the cover boards and then depressed the leather into the space that I created.


The Blue Star was given blue ribbon markers and...

BOOK: Triangular Book

This book is a modified Size 5 book that has had the sides cut down to create an equilateral triangle for the cover.

So the spine of the book is a full eleven inches (10.5 for the block) and the width at the middle is nine inches (8.5 for the block).

The book was done for a client out of Norway who wanted an 'unusual book' with a triquetra recessed into the cover. This is actually the second of two triangle books that I did. This version had no closures (at the client's request) and the second had no cover design but two snap closures located midway along the two angled sides.

The second book was given to the prop company who did the work for Stargate: SG1. There was a call on one of my bookbinder forums where the prop company needed a 'bunch' of handmade books but did not have the budget to buy them from a prop maker. So the head prop guy put the word out that he would accept any donations and send all of the binders back a letter of acceptance and appreciation. Basically it was a way for binding geeks who were also into SCI-FI to get their hobby on film.

So I thought that a triangular book would catch their attention. Sure enough - if you look real carefully in the background of Episode 11, Season 3 (Past and Present) where you see a pile of books and notebooks you'll see the triangular edge of my book. Granted you have to be looking for it but when I saw it I gave a not-so-silent Whoot-Whoot!

So to show off what the inside of the book would look like if you used it for actually writing, a good friend of mine took one of the blank pages I had cut out but did not use and threw in some basic illustration and text to show off the alignment.

BOOK: Acorn: Children's Book

An large book made for a friend as a 'baby album'.

The center design was a hand-sculpted, fimo acorn that was painted copper and painted oak leaves around it.


The book uses a variety of techniques and elements including a leather spine, corners, paper-cover and added paper decorations.


The oak leaves were cut from card stock and painted to appear 'distressed' and glued to the cover around the center pendant. The pendant, cast from a real acorn, is actually removable from the book - a gift for the little girl for whom the book was made.


Dimensions:


The book was approximately a size 5 (9x12) with a pig skin spine, raised cords and protected corners.